in-game weapon. You'll learn about how to set up and use Gradients.

First create a new Photoshop document 128 by 128 pixels.

Next, change the background colour to black. Go to Edit -> Fill

Add an empty layer then select the Gradient Fill tool:

Then zoom into the image by pressing CMD +
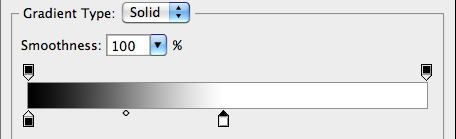
Click in the gradient preview at the top of the document window
to open the gradient settings panel.

The gradient is controlled by two sets of markers above and below called 'stops'. The bottom pair of stops controls the colour change along the gradient. Sliding the stops closer together makes the colours change more quickly. The dot between the stops is the 'midpoint'. You can move it closer to the left or right stop to have more control over how fast the colour changes.
Putting it closer to the right will make the gradient stay black for longer before changing to white:

Clicking between the stops adds another one and double clicking on the coloured square part of the stop opens the colour selection window. The pair of stops above the gradient control the transparency and work exactly like the colour stops.
To make the plasma bolt we need a gradient that goes from white to light blue:

and goes from 100% solid to completely transparent:

Then push the white colour stop and the left transparency stop past the middle of the gradient so the plasma ball itself is solid white:

To bring out the edge of the ball of plasma, it helps to add in a contrasting colour. Click to the right of the white colour stop and set the colour to a darker, purplish blue. Finally add one more stop to the right with a bluer colour

Click OK and make sure the radial gradient option is selected in the gradient tool controls:
Finally, click in the exact centre of the image and draw a gradient out to near the edge
No comments:
Post a Comment
Note: only a member of this blog may post a comment.