- How to work with 'Paths' which are used to make shapes
- What 'Layer Effects' are and how to use them
- Using Blending Modes to control how layers are mixed
Make a new document, 128 by 128 pixels, fill the background with black then create an empty layer. Select the Ellipse Tool:
Drag out an ellipse in the middle of the image. Hold the SHIFT key to make it a perfect circle.
Next, click on the Path Selection Tool
and click on the outline of the circle you've just made. Press CMD-C to copy the outline, then CMD-V to paste a new copy straight over the first one. Next press CMD-T to enable the Free Transform Tool. A transform box will appear around the new copy of the outline. Click the corner 'handle' of the transform box. Hold down the SHIFT key to keep the outline circular and the ALT key to transform around the centre of the shape rather than the corner.
Make the inner circle about 50% smaller than the outer one. Finally, press ENTER to finish the transform and lock the circle in place. Then go to the Path Tool controls at the top of the window and click the 'Subtract from Shape' button.
You should end up with a hole cut out of the white circle:
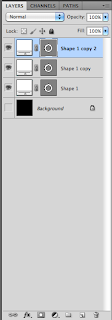
Next we're going to add a red tint to the edges of the ring. First, make a copy of the layer so we have a back up by dragging it to the 'New Layer' icon at the bottom of the Layers panel. Make a second copy. We will be using it later.
Rename your layers, 'Bulb', 'Glow' and 'Ring' from top to bottom then double click on the 'Bulb' layer to open the Layer Effects window:
Click on the 'Inner Glow' option from the list and make sure the box is ticked, then select the gradient option, change the gradient start colour to a light shade of red and the Blend Mode to 'Normal'. Set the size to around 8.
You should have a white ring with a red glow to the edges. Next select the 'Glow' layer. Double click in the white colour swatch in the layer to open the fill colour window and set the colour to a bright red.
There is now a red ring hidden behind the white ring. Next we're going to blur out the red ring to create the Neon glow around the bulb. You won't be able to put a blur directly on the layer yet. If you do, you will get an error message.
Because the ring is created using Paths, it doesn't contain actual pixels, just shaped outlines which define where the pixels will go. To create actual pixels that can be blurred you will have to 'Rasterize' it, right click on the layer and select Rasterize Layer.
Now go up tot the Effects menu and select Blur -> Gaussian Blur and set the Radius to give a nice red glow effect that isn't too small or too transparent. A value of around 10 should work.
For the final touches, make the black background visible. If the glow is too weak, you can add to it just by duplicating the Glow layer. Click on that layer and drag it down to the New Layer icon at the bottom of the Layers panel. Because the glow is transparent, the new copy will combine with the original glow to increase the brightness. Making a third copy will make the effect even stronger, or you could add another Gaussian Blur to spread the glow even more.
Finally you should end up with a Neon effect like this:


No comments:
Post a Comment
Note: only a member of this blog may post a comment.